We've modeled our costume concept off of the Broadway hyenas: 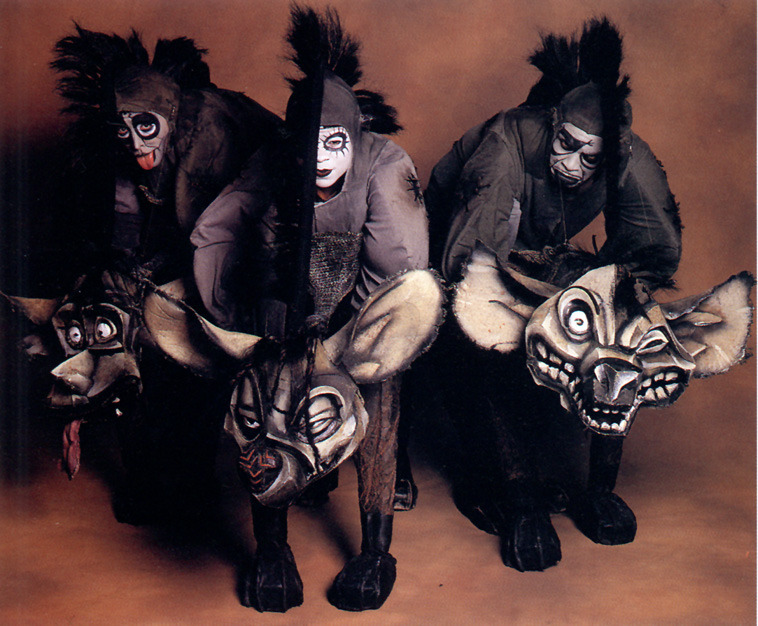
So,
step 1 for making these babies involved constructing hyena feet for our
feet. For our front legs, we will be doing hand stilts with paws
attached (and that will be another post). Although I will admit that
the fur feet are time consuming, they really are not hard to construct.
Step 1:
Get yourself some foam. We used a block of Premium Poly Foam, 4" x 22"x 22".
Cut
the foam down into manageable blocks, and then place your shoe on the
foam and draw an outline. Once your outline is drawn, carve out a hole
for the shoe to sit in, like so:

Glue the cut-out piece to the shoe using hot glue.
 When you have your shoe glued in the foam, draw your paw shape on top. 
Step 3:
Cut
the paw shape out, and use scraps to cover the back of the shoe with
hot glue. Once you have everything secured to the shoe, you can work on
carving a better paw shape into the foam:

.jpg) Step 4: Using whatever fur you decide will work for your feet (we used a short pile black fur), drape the fur over your carved feet, and cut out a square that is about 1-2 inches larger around than your feet. Next, pin the fur onto the foot form. Once you have everything pinned, you can start cutting (this may involve unpinning and repinning sections). Begin by cutting away any fabric that covers the sole of the shoe. At this point, cut slits between the carved toes, so that you can get the fabric to lay nicely around the toes. Next, you can start to cut out the darts (a dart is a small triangle of fabric that helps to make a flat piece of cloth into a moldable form capable of going around all the curves of the form), which will allow the fabric to lay flat on the paws without wrinkles once you have glued it down.   We made the cuts on the center of the main toe and around the sides of the other toes. This is fairly simple to do: unpin the fabric on the toe and pull it tight to get a triangle of fabric that hangs out or can be folded over. Next, cut off the triangle of fabric and pin down the remainder. If it overlaps a little, that's good. If it doesn't reach and leaves a space open then you can fill it in later with a strip of excess fabric (aka, everything is fixable!). You will also need to cut a triangle out at the heel, but you should do this after you have already glued down the paw (it makes it easier to pull everything tight, and get everything to line up). Start glueing your fur down. You will have to unpin sections as you work on them. Use a hot glue gun and glue small sections at a time (make sure to pull them tight). After glueing a section, hold it down firmly until your glue is set, and then continue on down from that section. Start at the toes. The way to go about it is to start at the base of the center toe and then work to the tip. Next, do the same for the surrounding toes. Once you have all the toes glued down, unpin the rest of the fabric and start glueing the top and sides from front to the back.  Step 6: Once you get to the opening for your foot, cut out a hole for your foot (an exacto knife helps), making this hole far smaller then your foot so you can then cut slits at the corners, allowing you to cover the inside lip of the shoe. Next, cut the dart out of the back to remove any wrinkles. Then just glue down the rest. Also glue down any fabric that wraps around underneath the shoe on the foam, then cut off any excess that covers the sole of the shoe. Step 7: If you find that you have bits of foam showing, fear not! You can either glue down more fur, or use a sharpie the color of the fur to color in any uncovered bits.  |
Monday, April 11, 2016
Furry Feet!


Lion King Hyena Masks

Mufasa! Mufasa! Mufasa!
The Lion King
For
the most part, this mask-making process was one great big experiment.
Luckily, it worked out! Our initial idea involved sculpting the masks
out of clay, covering the clay in vaseline, doing plaster of paris over
the clay, and then somehow just pulling the dried plaster off while
retaining the shape. Yeah, that didn't work. After failing miserably
at our plaster attempt after sculpting the Banzai mask, we regrouped and
started looking into other options. Ultimately, we settled on Worbla,
which comes in sheets and becomes mold-able when heated.
 |
| Putting the worbla on the Banzai form |
To apply the worbla, you just need a heat gun. We folded the worbla in half and heated it all up before getting to the application because one side of the sheet had an adhesive, and by "gluing" the two sides together, we ended up with a sturdier end-product. If you were just putting the worbla onto a foam base (for armor or something like that), you wouldn't need to go through that extra step. Once the two sides were put together, we just heated it up and molded it onto the clay as best we could. Application of the worbla ended up being a bit tricky, just due to the weirdly-shaped mask, but other than a few seams and a few misplaced wrinkles, we were really pleased with the end result.
 |
| Worbla applied to Banzai form |
 |
| Primered Banzai mask |
 | ||
| Side view of Shenzi sculpt |
 |
| Shenzi sculpt |
 |
| Worbla on Shenzi, Banzai covered in primer |
 |
| Primer applied to Shenzi |
Once
we got both of the masks coated in primer and realized that the seams
were still pretty visible, we purchased a jar of modeling paste, which
let us fill in the seams and then sand the dried paste down to create a
smooth form.
 |
| To help us cover, up the seams |
 |
| Seams covered in Liquitex |
 |
| Seams covered in Liquitex |
 |
| Sanded Liquitex |
 |
| Sanded Liquitex |
There
were, admittedly, still some errant wrinkles on the lips after the
molding paste was applied, but we were sufficiently happy (and not sure
how fixable they were) and decided to move forward with the paint job.
For painting, we used createx airbrush paints, and mixed together black
and white to create our desired shade of gray. We settled on the
createx because it also works on fabric, and we wanted to be able to
color-match our body-suits to our masks. We opted to go a hair lighter
than the hyenas were in the movie, just because we figured the features
and other paint would stand out more in person if we weren't a super
dark gray.
 | |
| Airbrushing Banzai |
 |
| Masks drying after getting their first coat of gray |
 |
| Faces being painted |
 |
| Finished Shenzi Mask! |
 |
| Banzai nearly finished, just needs his eyebrows in this one |
 |
| Add caption |
 |
| Finished Banzai mask! |
Subscribe to:
Posts (Atom)